

Các cloud service provider như GCE hay AWS, Digital Ocean đều cung cấp service build K8S cluster chỉ trong vòng 1 nốt nhạc, chỉ vài command hoặc vài cú click là xong. Tuy nhiên, user không thể access để thực hiện những tùy chỉnh trên k8s master. Đặc biệt là khi cần setup K8S High Availability với nhiều k8s master. Do đó user phải setup K8S cluster trên VM, hoặc bare metal from scratch. Bài này trình bày cách setup một HA K8S cluster trên bare metal. Thật ra để làm thì cũng tra GG cả thôi. nhưng có update thêm khi làm thực tế
Để tự setup from scratch thì user cần hiểu kĩ về kiến trúc K8S
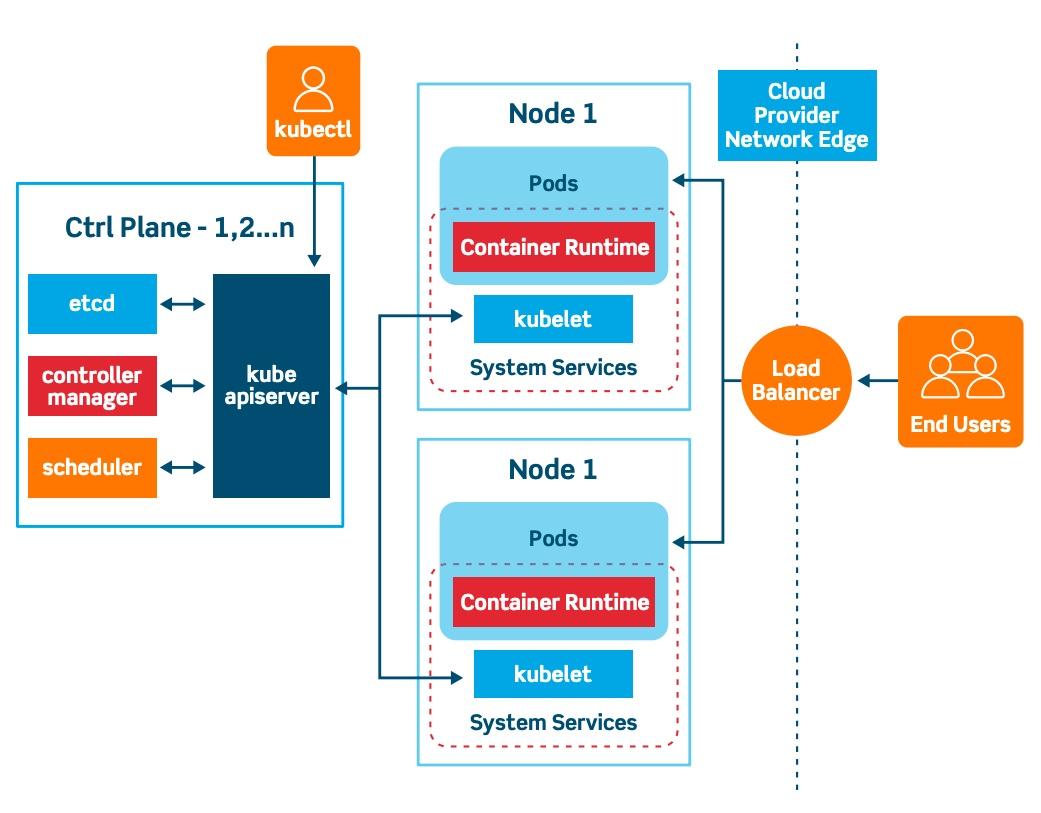
Chức năng của từng component trên là gì, độc giả có thể tìm trên Google, bài này đi sâu vào thực hành
Dựng một HA K8S cluster nhiều master node, tức là control plane component (kube-apiserver, kube-controller-manager and kube-scheduler) sẽ được replicas trên master node
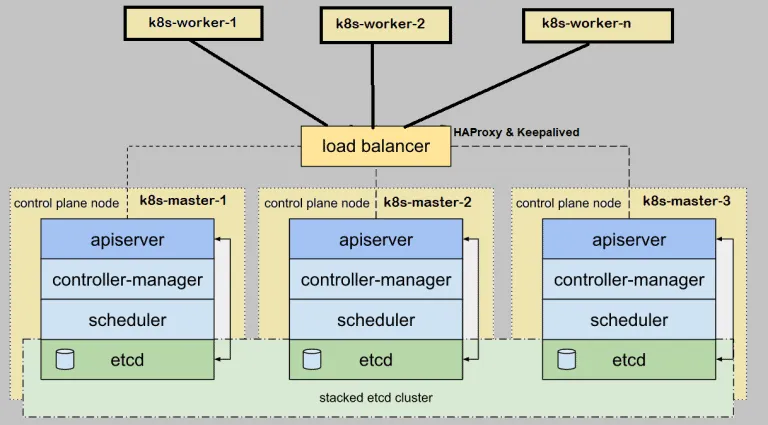
Một HA K8S cluster cần build up on-premise có kiến trúc như ở dưới
3 master node , 3 worker node và 1 load balancing, k8s worker sẽ connect tới k8s api server thông qua load balancing thay vì connect tới trực tiếp k8s-api-server trong trường hợp có 1 master như ở trên
Step 1) Setup VM
Như kiến trúc trên thì cần launch 3 VM master node, 3 VM worker node. Tôi sử dụng VM (ít nhất cần 2 VCPU), dùng hệ điều hành CentOS 7, mỗi VM đặt tên lần lượt là k8s-master-01, 02, 03 và k8s-worker-01,02,03
hostnamectl set-hostname "k8s-master-1"
Các VM này được deploy trên cùng 1 VPC và subnet, security group cho phép tất cả VM trong VPC open all đảm bảo connectivity được thông suốt
Để dễ nhớ ta cần set hostname cho từng VM bằng cách add vào /etc/hosts
Mọi thao tác trên từng VM được thực hiện bới user root
Reboot lại VM, sau đó access lại, bạn có thể connect từng VM qua hostname
Step 2) Set up Load balancing
Như kiến trúc ở trên chúng ta cần setup load balancing, có thể sử dụng nginx và haproxy. Kiến trúc này sử dụng HAproxy, sự khác biệt giữa nginx và haproxy có thể xem ở đây
Cài đặt haproxy và keepalived trên toàn bộ master và k8s-master-elb
yum install haproxy keepalived -y
Giải thích chút về keepalived, một thành phần không thể thiếu đối với hệ thống HA
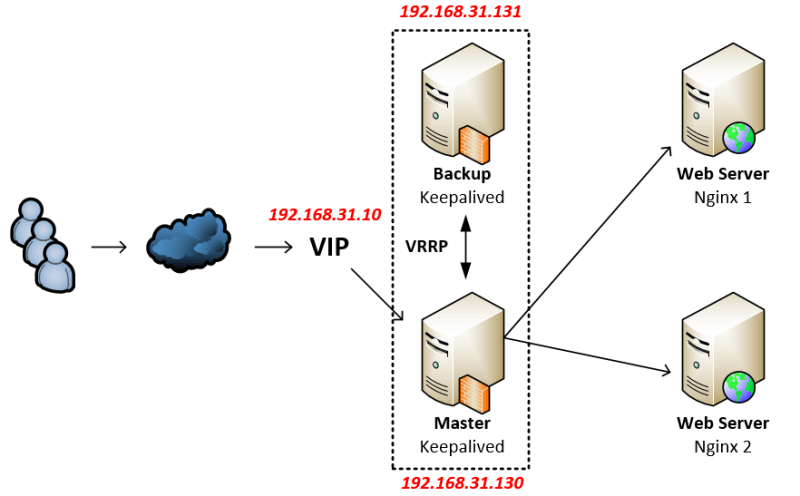
Hiểu thật nhanh về keepalived trong trường hợp này là những con node master sẽ được gom lại thành 1 cụm máy HA, con k8s-master-01 là master, còn 02, 03 thì thành slave, standby. Tất cả con master dùng chung một virtual IP, keepalived sẽ check master nào chết bằng healthcheck để failover sang con master khác, đảm bảo hệ thống luôn high availability
Virtual IP hoạt động như hình dưới IP Failover
Step 3) Configure keepalived
Sử lại keepalived config trên con k8s-master-01
cp /etc/keepalived/keepalived.conf /etc/keepalived/keepalived.conf.bak
Dùng ifconfig để biết VM đang sử dụng interface gì, set state k8s-master-01 là MASTER và VIP là IP của k8s-master-elb
Viết một script để check status của kube-apiserver load balancing
#!/bin/sh
APISERVER_VIP=172.31.72.105
APISERVER_DEST_PORT=8443

errorExit() {
    echo "*** $*" 1>&2
    exit 1
}

curl --silent --max-time 2 --insecure https://localhost:${APISERVER_DEST_PORT}/ -o /dev/null || errorExit "Error GET https://localhost:${APISERVER_DEST_PORT}/"
if ip addr | grep -q ${APISERVER_VIP}; then
    curl --silent --max-time 2 --insecure https://${APISERVER_VIP}:${APISERVER_DEST_PORT}/ -o /dev/null || errorExit "Error GET https://${APISERVER_VIP}:${APISERVER_DEST_PORT}/"
fi
Configure keepalived tương tự trên những con master còn lại, chú ý đổi slave thành SLAVE và priority về số nhỏ hơn
Verify keepalived có hoạt động không bằng lệnh dưới sẽ thấy VIP của server
[root@k8s-master-01 ~]# ip -br alo UNKNOWN 127.0.0.1/8 ::1/128 eth0 UP 172.31.67.43/20 172.31.72.105/24 fe80::148d:b3ff:feac:a067/64 docker0 DOWN 172.17.0.1/16 Stop keepalived trên master-01 thì sẽ thấy master-02 take over the VIP 172.31.72.105
Verify keepalived chạy OK
[root@k8s-master-01 ~]# journalctl -u keepalived
-- Logs begin at Tue 2021-03-09 01:14:38 UTC, end at Tue 2021-03-09 08:40:47 UTC. --
Mar 09 01:14:52 k8s-master-01 systemd[1]: Starting LVS and VRRP High Availability Monitor...
Mar 09 01:14:52 k8s-master-01 Keepalived[1275]: Starting Keepalived v1.3.5 (03/19,2017), git commit v1.3.5-6-g6fa32f2
Mar 09 01:14:52 k8s-master-01 Keepalived[1275]: Opening file '/etc/keepalived/keepalived.conf'.
Mar 09 01:14:52 k8s-master-01 Keepalived[1282]: Starting Healthcheck child process, pid=1285
Mar 09 01:14:52 k8s-master-01 Keepalived[1282]: Starting VRRP child process, pid=1286
Mar 09 01:14:53 k8s-master-01 Keepalived_healthcheckers[1285]: Initializing ipvs
Mar 09 01:14:53 k8s-master-01 Keepalived_vrrp[1286]: Registering Kernel netlink reflector
Mar 09 01:14:53 k8s-master-01 Keepalived_vrrp[1286]: Registering Kernel netlink command channel
Mar 09 01:14:53 k8s-master-01 Keepalived_vrrp[1286]: Registering gratuitous ARP shared channel
Mar 09 01:14:53 k8s-master-01 Keepalived_vrrp[1286]: Opening file '/etc/keepalived/keepalived.conf'.
Mar 09 01:14:53 k8s-master-01 Keepalived_vrrp[1286]: WARNING - default user 'keepalived_script' for script execution does not exist - please create.
Mar 09 01:14:53 k8s-master-01 Keepalived_vrrp[1286]: SECURITY VIOLATION - scripts are being executed but script_security not enabled.
Mar 09 01:14:53 k8s-master-01 Keepalived_vrrp[1286]: VRRP_Instance(VI_1) removing protocol VIPs.
Mar 09 01:14:53 k8s-master-01 Keepalived_vrrp[1286]: Using LinkWatch kernel netlink reflector...
Mar 09 01:14:53 k8s-master-01 Keepalived_vrrp[1286]: VRRP sockpool: [ifindex(2), proto(112), unicast(0), fd(10,11)]
Mar 09 01:14:53 k8s-master-01 systemd[1]: Started LVS and VRRP High Availability Monitor.
Mar 09 01:14:53 k8s-master-01 Keepalived_healthcheckers[1285]: Opening file '/etc/keepalived/keepalived.conf'.
Mar 09 01:14:54 k8s-master-01 Keepalived_vrrp[1286]: VRRP_Instance(VI_1) Transition to MASTER STATE
Mar 09 01:14:55 k8s-master-01 Keepalived_vrrp[1286]: VRRP_Instance(VI_1) Entering MASTER STATE
Mar 09 01:14:55 k8s-master-01 Keepalived_vrrp[1286]: VRRP_Instance(VI_1) setting protocol VIPs.
Mar 09 01:14:55 k8s-master-01 Keepalived_vrrp[1286]: Sending gratuitous ARP on eth0 for 172.31.72.105
Mar 09 01:14:55 k8s-master-01 Keepalived_vrrp[1286]: VRRP_Instance(VI_1) Sending/queueing gratuitous ARPs on eth0 for 172.31.72.105
Mar 09 01:14:55 k8s-master-01 Keepalived_vrrp[1286]: Sending gratuitous ARP on eth0 for 172.31.72.105
Step 4) Configure haproxy
Edit vim /etc/haproxy/haproxy.cfg
Thêm
#---------------------------------------------------------------------
HAProxy điều tiết các request tới các backend ở đây là các master node kube-apiserver port 6443
Enable haproxy and keepalived trên 3 con master node
[root@k8s-master-02 ~]# systemctl enable keepalived --now
Verify port 8443 api server đã listening chưa bằng lệnh
netstat -nlp |grep 8843Virtual IP của con elb được enable
Step 5) Disable Swap, set SELinux as permissive
Swap là vùng trên disk mà OS sử dụng khi bộ nhớ ram được dùng hết. Tại sao phải có bước này bởi gì k8s không hỗ trợ container memory swap. SELinux là gì thì xem ở đây

Step 6) Cài đặt container, kubectl, kubeadm, kubelet
Chú ý nên cài docker 17.3 không nên cài những bản cao hơn để tránh vấn đề ko tương thích giữa k8s và docker
Cài đặt lần lượt 2 bản này
docker-ce-selinux-17.03.0.ce-1.el7.centos.noarch.rpm
docker-ce-17.03.0.ce-1.el7.centos.x86_64.rpm
Start docker service
systemctl enable docker –now
Một số OS có thể có lỗi như ở dưới

Sửa như link
Change cgroup to systemd, driver là overlay
Thêm vào
/etc/docker/daemon.json
Còn lại mấy tool kia thì cài như guide trên google
cat <<EOF | sudo tee /etc/yum.repos.d/kubernetes.repo
Step 7) Boostrap k8s
[root@k8s-master-01 ~]# kubeadm init --control-plane-endpoint "k8s-master-elb:8443" --upload-certsCần tham số control-plane-endpoint đó là recommend của GG khi build HA k8s
(Recommended) If you have plans to upgrade this single control-plane kubeadm cluster to high availability you should specify the –control-plane-endpoint to set the shared endpoint for all control-plane nodes. Such an endpoint can be either a DNS name or an IP address of a load-balancer.

[root@k8s-master-01 ~]# mkdir -p $HOME/.kube
Run trên những con master, worker còn lại để join node, thêm option --v=5 để xem được log
[root@k8s-master-02 ~]# kubeadm join k8s-master-elb:8443 --token 5blis3.4v3e47rkka9bqylb \
Troubleshooting
VIP un-reachable
[centos@k8s-worker-01 ~]$ telnet k8s-master-elb 8443
Trying 172.31.72.105...
telnet: connect to address 172.31.72.105: No route to host
Node not ready

Troubleshooting bằng
kubectl describe node k8s-master-01

Như note ở dưới
You must deploy a Container Network Interface (CNI) based Pod network add-on so that your Pods can communicate with each other. Cluster DNS (CoreDNS) will not start up before a network is installed.
Ở đây mình sử dụng flannel
https://kubernetes.io/docs/concepts/cluster-administration/networking/
[root@k8s-master-02 ~]# cat /etc/cni/net.d/10-flannel.conflist


0 Nhận xét