
There’re many famous software such as Maya, AutoCAD, Solid Work which can display the 3D model. Moreover, those software also support user to manipulate the 3D Model like Zoom, Move, Rotate the 3D model.
In this article, I will guide you how to read a 3D model file, display it on Window screen as well as manipulate it (Zoom, Move, Rotate) like those software.
We will develop a WPF Window Application (Window Presentation Framework) to display the 3D model file. The simple way to display 3D model is combining WPF with 3rd library (Helix Toolkit)
Windows Presentation Foundation (WPF) is a next-generation presentation system for building Windows client applications. This framework is an improvement compare to Window Form with support attractive GUI, Graphic, Video. With WPF, you can create a GUI application as well as browser-hosted applicationGetting Started with WPF 3D Model
Helix Toolkit builds on the 3-D functionality in Windows Presentation Foundation (WPF). This library provides a higher level APIs for working with 3-D in WPF, via a collection of controls and helper classes. Although this library only supports few 3D model formats like STL or OBJ, and not support other popular 3D formats such as IGES, DXF, but it is open source, free and the simplest way to display the 3D model
Install Helix Toolkit
First you need to install the Visual Studio. You can download Visual Studio (Express or Professional version) on Microsoft website
Create a new WPF Window Application project
Install the Helix Toolkit library via Package Manager Console
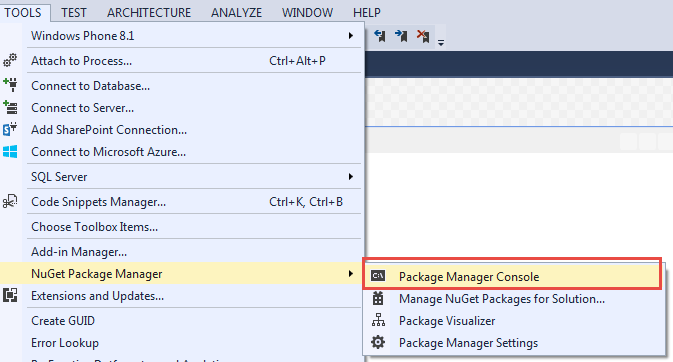
On Visual Studio , Select Tool --> Nuget Package Manager --> Package Manager Cosole
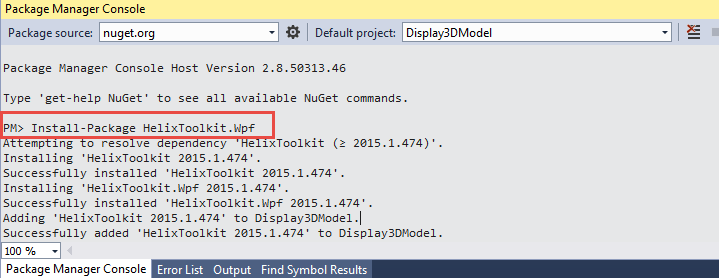
 On Console, type the command
Quote:
Install-Package HelixToolkit.WPF
Visual Studio automatically download the Helix Tookit library and install it to the project
On Console, type the command
Quote:
Install-Package HelixToolkit.WPF
Visual Studio automatically download the Helix Tookit library and install it to the project
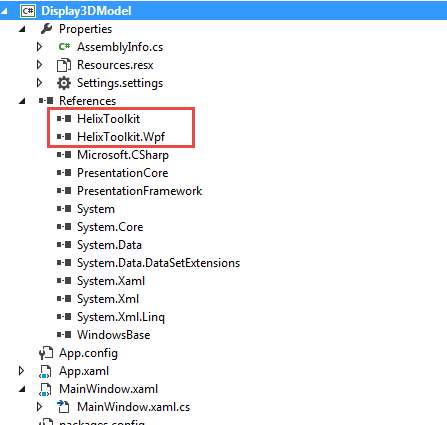
 After downloading successfully, the Helix Toolkit is automatically installed to your project
 Create your 3D viewport
HelixViewport3D is the default view port of Helix Toolkit. This is the place where will display your 3D model.
Open the MainWindow.xaml, add the following code
Hide Copy Code
<Window x:Class="Display3DModel.MainWindow"
xmlns="http://schemas.microsoft.com/winfx/2006/xaml/presentation"
xmlns:x="http://schemas.microsoft.com/winfx/2006/xaml"
xmlns:helix="http://helix-toolkit.org/wpf"
Title="MainWindow" Height="350" Width="525">
<Grid>
<helix:HelixViewport3D x:Name="viewPort3d" ZoomExtentsWhenLoaded="true" Grid.RowSpan="2" >
<!-- Remember to add light to the scene -->
<helix:DefaultLights/>
</helix:HelixViewport3D>
</Grid>
</Window>
HelixViewport3D has parameter ZoomExtentWhenLoaded. If it is set true, the 3D Model is automatically zoom in when loading. If set false, the 3D Model display with its orginial size
Load 3D Model File
After create the 3D viewport, now you can load the 3D content on this viewport. The Helix Toolkit support loading the several 3D model format such as STL or OBJ format.
STL format is 3D format but doesn’t have color. OBJ format is 3D format but includes color
Hide Copy Code
/// <summary>
/// Display 3D Model
/// </summary>
/// <param name="model">Path to the Model file</param>
/// <returns>3D Model Content</returns>
private Model3D Display3d(string model)
{
Model3D device = null;
try
{
//Adding a gesture here
viewPort3d.RotateGesture = new MouseGesture(MouseAction.LeftClick);
//Import 3D model file
ModelImporter import = new ModelImporter();
//Load the 3D model file
device = import.Load(model);
}
catch (Exception e)
{
// Handle exception in case can not find the 3D model file
MessageBox.Show("Exception Error : " + e.StackTrace);
}
return device;
}
Define path to the model file. In this case, you should copy the model file to same directory with the executable file
Hide Copy Code
//Path to the model file
private const string MODEL_PATH = "Model.stl";
In MainWindow, cretate an instance of ModelVisual 3D
Hide Copy Code
ModelVisual3D device3D = new ModelVisual3D();
Load 3D Content and add it to the ViewPort which you have created above.
Hide Copy Code
device3D.Content = Display3d(MODEL_PATH);
// Add to view port
viewPort3d.Children.Add(device3D);
Model.obj is the 3D model file you need to load in this case. I attached a sample of OBJ file to the source code.
So in the MainWindow.xaml.cs, the completed code is
Hide Shrink
Create your 3D viewport
HelixViewport3D is the default view port of Helix Toolkit. This is the place where will display your 3D model.
Open the MainWindow.xaml, add the following code
Hide Copy Code
<Window x:Class="Display3DModel.MainWindow"
xmlns="http://schemas.microsoft.com/winfx/2006/xaml/presentation"
xmlns:x="http://schemas.microsoft.com/winfx/2006/xaml"
xmlns:helix="http://helix-toolkit.org/wpf"
Title="MainWindow" Height="350" Width="525">
<Grid>
<helix:HelixViewport3D x:Name="viewPort3d" ZoomExtentsWhenLoaded="true" Grid.RowSpan="2" >
<!-- Remember to add light to the scene -->
<helix:DefaultLights/>
</helix:HelixViewport3D>
</Grid>
</Window>
HelixViewport3D has parameter ZoomExtentWhenLoaded. If it is set true, the 3D Model is automatically zoom in when loading. If set false, the 3D Model display with its orginial size
Load 3D Model File
After create the 3D viewport, now you can load the 3D content on this viewport. The Helix Toolkit support loading the several 3D model format such as STL or OBJ format.
STL format is 3D format but doesn’t have color. OBJ format is 3D format but includes color
Hide Copy Code
/// <summary>
/// Display 3D Model
/// </summary>
/// <param name="model">Path to the Model file</param>
/// <returns>3D Model Content</returns>
private Model3D Display3d(string model)
{
Model3D device = null;
try
{
//Adding a gesture here
viewPort3d.RotateGesture = new MouseGesture(MouseAction.LeftClick);
//Import 3D model file
ModelImporter import = new ModelImporter();
//Load the 3D model file
device = import.Load(model);
}
catch (Exception e)
{
// Handle exception in case can not find the 3D model file
MessageBox.Show("Exception Error : " + e.StackTrace);
}
return device;
}
Define path to the model file. In this case, you should copy the model file to same directory with the executable file
Hide Copy Code
//Path to the model file
private const string MODEL_PATH = "Model.stl";
In MainWindow, cretate an instance of ModelVisual 3D
Hide Copy Code
ModelVisual3D device3D = new ModelVisual3D();
Load 3D Content and add it to the ViewPort which you have created above.
Hide Copy Code
device3D.Content = Display3d(MODEL_PATH);
// Add to view port
viewPort3d.Children.Add(device3D);
Model.obj is the 3D model file you need to load in this case. I attached a sample of OBJ file to the source code.
So in the MainWindow.xaml.cs, the completed code is
Hide Shrink  Copy Code
using HelixToolkit.Wpf;
using System;
using System.Windows;
using System.Windows.Input;
using System.Windows.Media.Media3D;
namespace Display3DModel
{
/// <summary>
/// Interaction logic for MainWindow.xaml
/// </summary>
public partial class MainWindow : Window
{
//Path to the model file
private const string MODEL_PATH = "Model.stl";
public MainWindow()
{
InitializeComponent();
ModelVisual3D device3D = new ModelVisual3D();
device3D.Content = Display3d(MODEL_PATH);
// Add to view port
viewPort3d.Children.Add(device3D);
}
/// <summary>
/// Display 3D Model
/// </summary>
/// <param name="model">Path to the Model file</param>
/// <returns>3D Model Content</returns>
private Model3D Display3d(string model)
{
Model3D device = null;
try
{
//Adding a gesture here
viewPort3d.RotateGesture = new MouseGesture(MouseAction.LeftClick);
//Import 3D model file
ModelImporter import = new ModelImporter();
//Load the 3D model file
device = import.Load(model);
}
catch (Exception e)
{
// Handle exception in case can not file 3D model
MessageBox.Show("Exception Error : " + e.StackTrace);
}
return device;
}
}
}
Now, build and run your WPF project, the 3D model is loaded as following
Copy Code
using HelixToolkit.Wpf;
using System;
using System.Windows;
using System.Windows.Input;
using System.Windows.Media.Media3D;
namespace Display3DModel
{
/// <summary>
/// Interaction logic for MainWindow.xaml
/// </summary>
public partial class MainWindow : Window
{
//Path to the model file
private const string MODEL_PATH = "Model.stl";
public MainWindow()
{
InitializeComponent();
ModelVisual3D device3D = new ModelVisual3D();
device3D.Content = Display3d(MODEL_PATH);
// Add to view port
viewPort3d.Children.Add(device3D);
}
/// <summary>
/// Display 3D Model
/// </summary>
/// <param name="model">Path to the Model file</param>
/// <returns>3D Model Content</returns>
private Model3D Display3d(string model)
{
Model3D device = null;
try
{
//Adding a gesture here
viewPort3d.RotateGesture = new MouseGesture(MouseAction.LeftClick);
//Import 3D model file
ModelImporter import = new ModelImporter();
//Load the 3D model file
device = import.Load(model);
}
catch (Exception e)
{
// Handle exception in case can not file 3D model
MessageBox.Show("Exception Error : " + e.StackTrace);
}
return device;
}
}
}
Now, build and run your WPF project, the 3D model is loaded as following
 After loading, you can use mouse to zoom in/out and move the 3D model in Window easly. If you use the Touch Screen PC, you can use the Touch Manipulation to manipulate this 3D model.
The article includes a sample 3D model file for demo. You can download tons of 3D Model here
Download source code here
After loading, you can use mouse to zoom in/out and move the 3D model in Window easly. If you use the Touch Screen PC, you can use the Touch Manipulation to manipulate this 3D model.
The article includes a sample 3D model file for demo. You can download tons of 3D Model here
Download source code here


1 Nhận xét
thank you giaosucan
Trả lờiXóa